Movement – email guide for reps in Prospect
Movement is the bulk email sending tool for branch and section reps in Prospect.
The simple online platform makes it easy to manage outbound email with your members. At present, we use Movement for email, but not its phone or text campaign functionality.
Important: When using Movement, please do not update any member records. Membership data and mailing preferences are synced with our central database – updates should be made via the Prospect membership team.
Log in – Movement uses the same login credentials as the member portal and Knowledge Hub.
If you are logged in to the Knowledge Hub, you don’t need to re-enter your credentials. Follow the ‘My account > Email my members’ link. Then sign in to Movement as either a Prospect or a Bectu member.
If you are not already logged in to the portal/Knowledge Hub, the Sign in with Prospect/Bectu buttons on the Movement login screen will take you to the member portal/Knowledge Hub login page and then redirect you to Movement after you have logged in there.
Movement permissions are determined by your rep role*.
(*Secretary, Assistant Secretary, Chair, Vice Chair, Member & Recruitment Secretary, Organiser, Communications Rep have access.)
Contents
Prefer a video walk-through?
Building an email audience
Creating email campaigns
Clicking a thumbnail image in the guide below opens it in the same browser tab. Clicking the figure link in the text, opens the image in a new tab.
Find your way around Movement
Each page in Movement’s control panel features a collapsible left-sidebar with links to Home, Campaigns, Audience. At the foot of the sidebar there is a link to Movement’s support centre.
A universal search bar spans across the top of each page where you can look up campaigns, people and other Movement users in your branch. On the top-right is a notifications icon and a link to your profile. (fig.1)

fig.1 home – click to expand
Campaigns page
The Campaigns list page shows all campaigns, their status (e.g. ‘draft’ or ‘sent’) and the number of recipients. (fig.2)
It’s possible to filter and sort the campaign list or search for mailing campaigns by name. If you click the star to the left of the campaign name, it will be saved above the main list for quick access.

fig.2 campaigns – click to expand
Audience page
Movement’s Audience page is where you see existing audiences and a link to create new ones. By ‘audience’ we mean a mailing list. (fig.3)
The main content window shows four tabs across the top.
- The ‘All audiences‘ tab shows all dynamic search and static list audiences, saved search templates are displayed at the top of this tab.
- ‘Archived audiences‘ show those that are no longer in use.
- ‘All people’ displays a list of people you can email.
- ‘Lists‘ show only the static audiences created by upload or pasting in details.
On the right hand side, there’s a count of the members you have access to.
The lower part of the Audience page shows ‘Your audiences’.
Below each audience ‘Name’ you see the audience type (Template search, Dynamic search or Static list) and the date it was created or refreshed to update the count. The listing can be sorted alphabetically or by the number of people in it. (fig.4)
Dynamic search based audiences and templates are denoted by a green icon, Static lists by a grey icon. The column on the right can be used to launch a campaign or view members, or in the case of a search template, use that saved search as the basis of a new search.

fig.3 audience – click to expand

fig.4 audience lists – click to expand
To simplify audience creation, your access to member records is restricted to the people you can email. This is determined by your branch and union rep role. You may have the option of sending emails to a whole branch, a section, sub section and/or members in different locations or workplaces.
To create a dynamic audience, click the ‘Create an audience’ button at the top-right of the ‘Your audiences’ section. This will open the audience builder (fig.5) where you can follow the steps below:
- Include everyone who matches ‘all‘ of the criteria as listed below.
- The default search filter should always match ‘active’. By default this selection includes all members your rep role allows you to email
- Click the ‘+ Add filter’ button and then select an audience filter. (fig.5b) to use. e.g. choose ‘Organisations & Geography’ followed by ‘Within an Organisation’ to narrow down a branch audience to a section, employer or workplace. Once selected you can start typing the name of the organisation you want to email into the lookup. Please note: many of the filter options presented do not hold data.
- Click ‘Next: confirm your audience‘.
Note, in the lookup the same name might be used for branch, employer or workplace. In this case look for the organisation type in the brackets that follow the name.
Following only the first two steps is sufficient to email all opted-in members in a branch. Step 3 is only required to drill down to a section/employer/workplace audience. It’s possible to create more advanced audiences by adding multiple filters and choosing whether to create an audience that matches ‘all’ or ‘any’ of them.
A ‘nested group’ allows you to combine ‘all’ and ‘any’ criteria.
Instead of defining your audience by the members you wish to add, it’s also possible to limit the scope by setting filters tol exclude members.
If you would like to create an audience by entering a code for a branch, section, subdivision, employer or workplace you can do this by adding a ‘Custom fields – Custom field text’ filter.
After you click to confirm your audience, the number of people who match the chosen criteria will show. If this number doesn’t match your expectation, you can return to the previous page to edit the criteria. You can click to ‘View people in the audience’.
To proceed click ‘Next: name your audience’.
After naming your audience, you have the option to save it as a template so that it’s added as a quick start audience. To use a template audience in an email campaign, the campaign must be launched from the link in the Quick Start. A template audience cannot be added to a campaign at a later stage.
An audience can also be shared with people in your branch section and sub-sections.
Ex-member details are removed from Movement on a daily basis. In reports on sent campaigns, the appear as “deleted member”.

fig.5 audience builder – click to expand
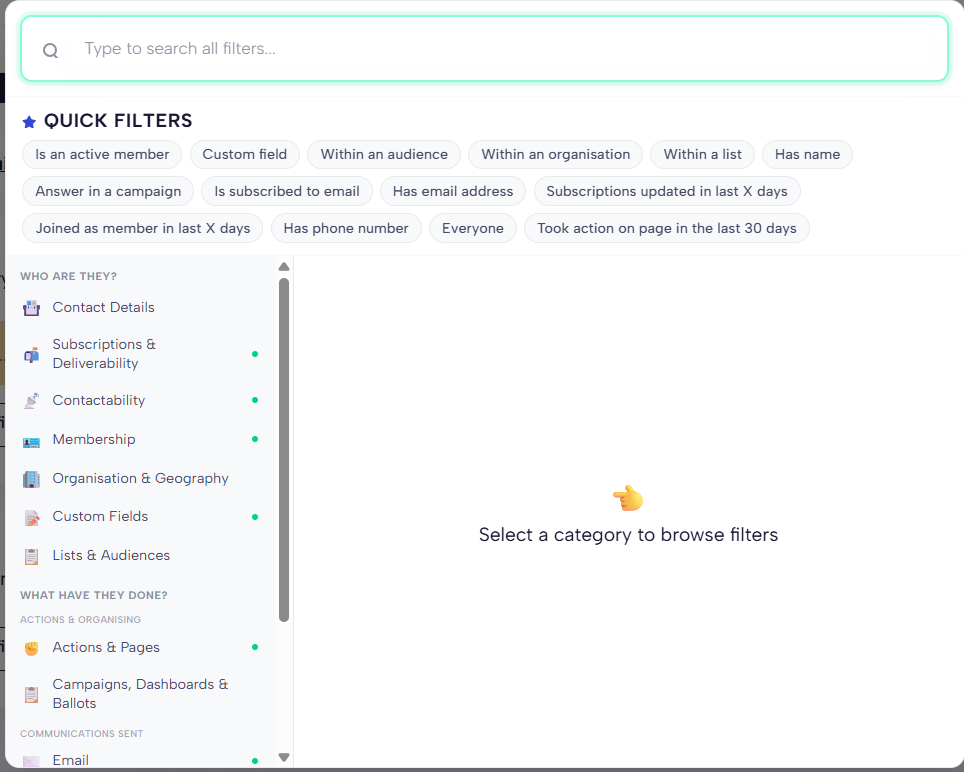
fig.5b audience filters – click to expand
Should you save an audience as a template?
While it’s possible to save your search as a template, this is not a necessary step. Unlike a regular audience, you cannot send a mailing to a template search.
Search templates are intended to provide a shortcut to creating more complex audiences. Saving a search as a template will save your filter settings – but this is only useful if you need to further refine the audience before sending your mailing.
Lists offer an alternative to criteria-based search audiences and can be created via the + Create a list button near the top-right of the Audience home screen.
A list can either be uploaded as a .csv of .xlsx file or pasted into the space provided on screen. (fig 5.5)
You must include either the preferred email address that is registered with Prospect/Bectu or a membership no. If the information added matches an existing member in Movement, the contact record will be added to your list.
Once a list has been created, it’s possible to add additional people via a lookup. On the list details page, there is an Add people button above the listing. Use this to find members to add using their name, email or membership number. Once you find the matching contact, click to add them to your list.
When viewing the list, each member row has a red Remove button at the end to easily remove them from the list.
Unlike search audiences which are dynamic and will automatically update if you refresh the count or use them in a mailing, a static list is fixed. You will need to manually add or remove your members. Members in lists who leave the union or who you no longer have access to mail, are removed from your list.
Lists are useful for creating audiences that are not easily defined by data we have in Movement. For example an ad hoc group like our branch exec.
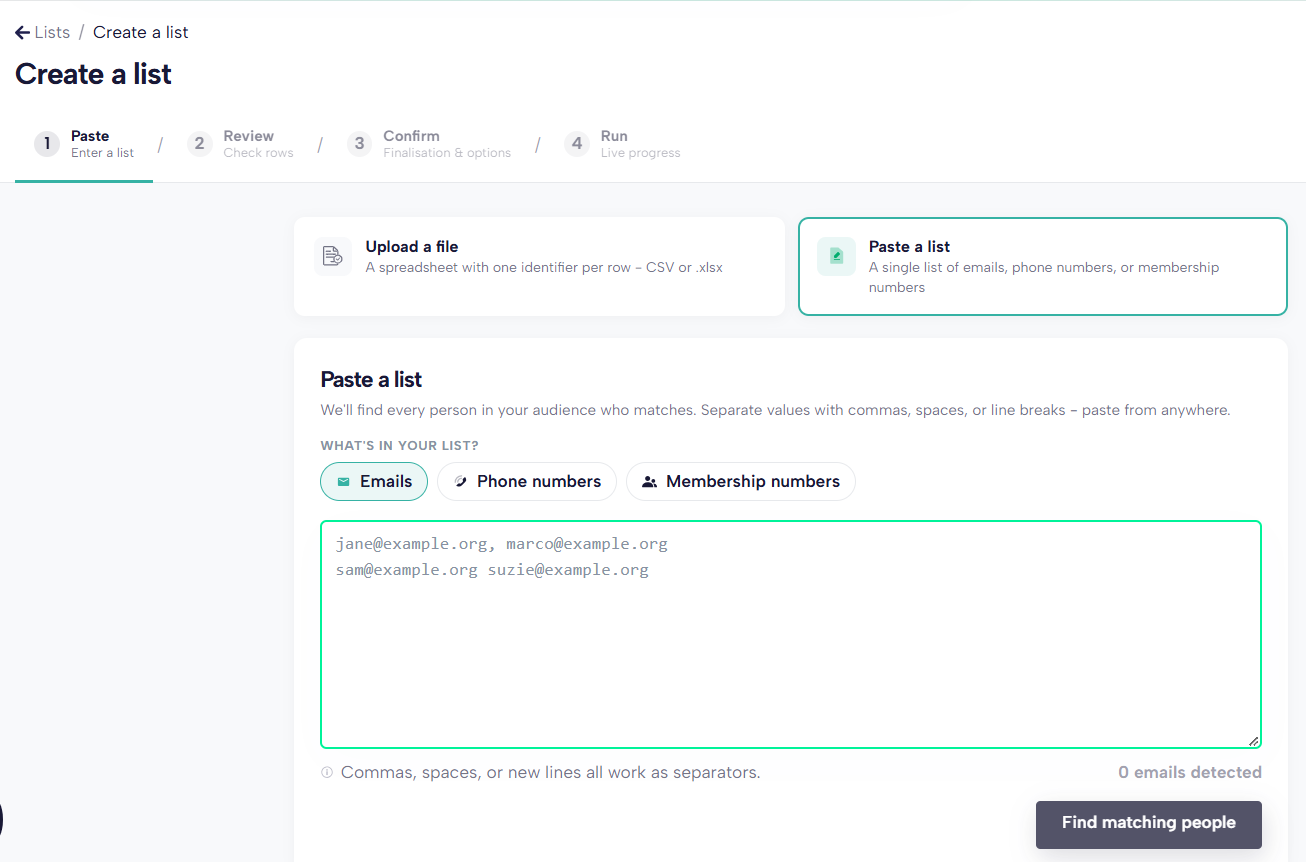
fig.5.5 lists upload or paste – click to expand
To start a new mailing click the dark + Create campaign button near the top-right of the main window of the ‘Campaigns’ page.
You can also find the + Create campaign button on the top-right of an audience details page or start a new mailing by clicking ‘New campaign’ in a quick start audience.
When you begin a new campaign, select ‘Email’ in the pop-up window to confirm the type of campaign. (fig.6)
(We don’t currently use Movement for phone and text campaigns.)
You will then need to name your campaign name and click ‘Begin’.
The campaign name is different to the email subject line. It’s used to list your mailing in Movement so using a consistent naming convention is helpful.
To help system admins who see a list of all campaigns, please prefix your campaign name with your branch name or a recognisable acronym/abbreviation.
e.g. Instead of naming your campaign ‘Branch update’ name it ‘Camera branch update’.
After providing a name, there are seven steps to build your campaign

fig.6 campaign type – click to expand
The at the start of each stage will turn green when edits to a section have been saved. (fig.7)
Click the ‘Edit’ button on the right to start completing a step. If you edit the content you must ‘Save’ or ‘Discard changes’ before proceeding to the next or returning to a previous step.
It’s possible to copy an existing campaign to edit and create a new one by selecting ‘Duplicate campaign’ under the ‘Manage’ button at the top-right.
You can pause set up and ‘Finish later’. Your progress will be saved.
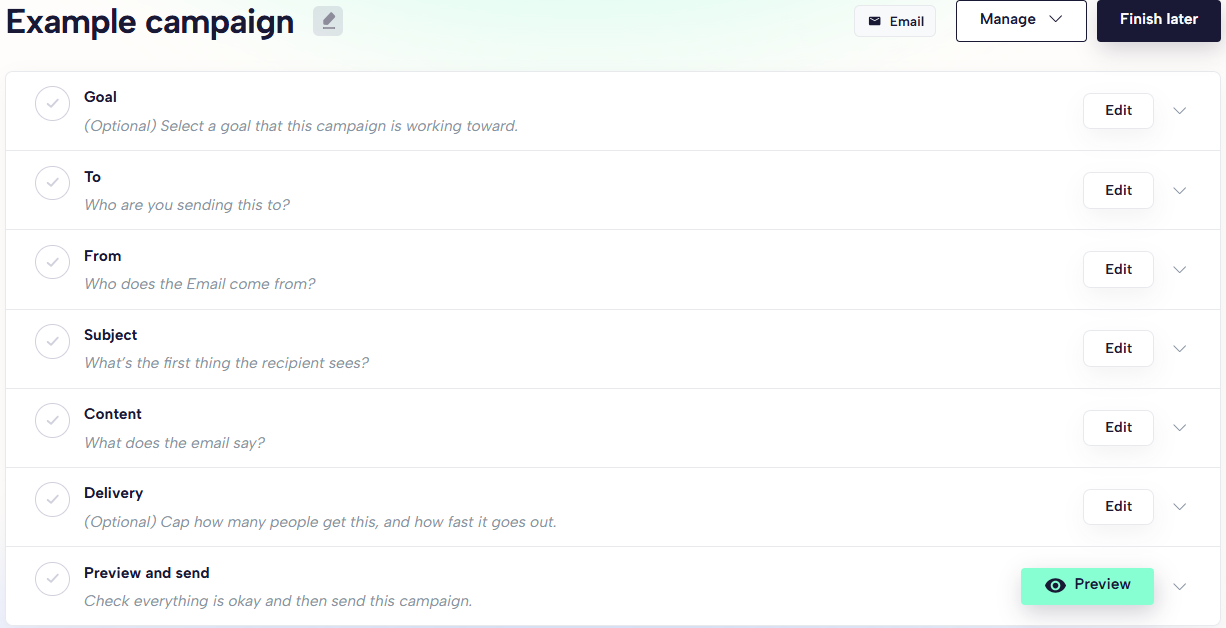
fig 7 – Movement email campaign steps
1. Goal
Goal is an optional step and not really relevant for us. It allows you to group multiple campaigns to make it easier to track results across long-term initiatives. (fig.8)

fig.8 goal – click to expand
2. To
To use an existing audience, select it from the dropdown or click ‘+ Create new’ to define a new one. (Remember – only dynamic search audiences or lists can be used here. A saved template will not be shown here. See Create a new audience for your mailing. (fig.9)
Do not tick the ‘Send to everyone in this audience, even if they’re unsubscribed’ checkbox.
Click ‘Save’ to proceed.

fig9. to – click to expand
3. From
Choose the relevant sender email address – either ‘Bectu <[email protected]>’ or ‘Prospect <[email protected]>’. (fig.10)
Replies to this sender email address are not monitored and so you can optionally enter a forward email address to receive replies under ‘People will reply to’.
Click ‘Change sender name’ to update the default, ‘Bectu/Prospect’ sender names – e.g. use your branch or personal name.
Click ‘Save’ to proceed.

fig.10 from – click to expand
4. Subject
Enter a subject line and optionally, include preview text. Some email clients display the preview text in the inbox and it can encourage engagement. There are tips on creating a good subject line on the right of the screen. (fig.11)
It’s possible to use merge tags (more on merge tags) in the subject line or preview text, to include custom data like a first name. You can do this via the at the end of the row.
Click ‘Save’ to proceed.

fig.11 subject – click to expand
5. Content
After clicking the dark ‘Launch email designer’ button you will be asked to pick a template to help you get started.
If you are a Bectu rep please select the Bectu template; if you are a Prospect rep please select the Prospect template. (fig.12)
The template includes a header, and footer with social links, that can’t be edited. Selecting a template, opens the content editor.

fig.12 settings – click to expand
Editing your email
An email is made up of blocks. To insert a block into the email click it in the list. The options are:
Paragraph | Image | Button | Header | Spacer | Divider | HTML | Table. (fig.13)
When a block is selected, related setting options will show in the side-panel to the right.
To add another block you can click the that appears above or below an existing selected block. Besides each block, up and down arrows will reorder content, and there’s a delete button.

fig.13 settings – click to expand
Using the paragraph block
The first tab is the ‘Visual’ editor. From left to write, the buttons illustrated above give you the following options: (fig. 14)
- Change font size
- Change font family/type
- Bold your text
- Italicise your text
- Underline your text
- Add a hyperlink
- Change the alignment of your text
- Add a bulleted list
- Add a numbered list
- Use merge tags
- Insert a table
The second tab presents an option to edit content in HTML.
If pasting in content, please do so as plain text – otherwise you may see formatting errors.
Using merge tags
Merge tags can be inserted into text blocks like paragraphs to show data stored in custom fields.
For example, you could use the first_name merge tag in a greeting: like ‘Dear {{first_name}}‘.
When using a merge tag, it may be useful to provide fallback text for instances where we don’t hold that data for a particular member.
A merge tag is editable if you switch from the Visual to HTML view. You can also create a new one by typing the tag name inside {{ }}. If you follow the tag name with a pipe ( ‘|’ ) then ‘default:’ you can add the fallback text within quotation marks.
e.g. ‘Dear {{first_name | default:’member’}} will match ‘Dear Sally’ etc or ‘Dear member’.
Data about a member in Movement that can be included via a merge field includes:
First name | Last name | Email | Member no. | Status | Employer | Workplace | Branch | Section | Sub Section | Bectu Division | Bectu Sub Division | Join date
Merge fields for address and phone numbers are empty – this information is not available in Movement.
Using images
Uploaded images will display in landscape orientation in their own block. There are settings to align and resize them and they can be linked to a url, email, phone number or file. Its good practise to add descriptive alt text to all images.
Using buttons
Buttons provide a great way to highlight an action you want your recipient to take. You can define button text and link it to a web address, email, phone number or file that’s uploaded to the Movement server.
Files
Inserting file attachments is not good practice in bulk mailings. They increase the size of the mailing and the chances of it being blocked by a recipient’s mail server. Instead, we suggest you upload files as resources to the new branch pages on the Knowledge Hub. Alternately, you can use a cloud service like One Drive or Google Drive and share the link in the email.
It is possible to upload files to Movement when creating button links. The file will be stored on the Movement server and a link to it will be attached to the button click.
Links to web, email and phone
When inserting a url link, it will be recognised as a web link, so you must add the correct protocol in the url field if inserting a linked email address or phone number:
- For email use ‘mailto:’ – e.g. mailto:[email protected]
- For phone use ‘tel:’ – e.g. tel:03006001878
Link best practice and avoiding spam filters
To prevent your link text from being converted we recommend you type descriptive text and link it.
e.g. instead of inserting https://bectu.org.uk/get-involved-in-the-union/ratecards/, add the link to Bectu ratecards.
In the case of a ‘call to action’ a button link is a good alternative option.
We do our best to comply with email sending best practice centrally. But the language you use in the email subject line and copy is a key factor in determining spam. Avoid obviously spammy language like “!!!SALE!!!”, overuse of emojis and keep your content concise and meaningful.

fig.14 settings – click to expand
Add your own contact details
The email footer contains important information which cannot be edited including the address and phone for Prospect HQ. You may find it useful to add your own branch contact details, which you do in a separate block above the footer.
While you edit email content you can see an approximation via the ‘Preview’ button above the editor – you can switch between a desktop and mobile view. Once you’re happy with the content you should click the green ‘Save’ button or the dark ‘Continue’ button to proceed.
If you don’t save your work before closing the page or navigate back to the steps via the back button you will lose any unsaved updates.
6. Settings
You don’t need to change these settings to send your emails in a single batch but it is possible to change the sending mode to ‘Send an amount per hour’ to throttle delivery. This is only likely to be of value of you anticipate a large volume of replies and you wish to stagger these. (fig.15)

fig.15 settings – click to expand
7. Preview and send
A preview email which can be toggled between desktop and mobile view will appear with a list of its intended recipients to its left. If you use merge tags you can view how the email appears to different recipients by selecting their name in the left-hand list – there’s a recipient search above the list to find specific people if required. (fig.16)
Before sending your email we strongly recommend you send yourself a sample copy, or a copy to a colleague to proofread and check the links are working.
When you click ‘Send’ a ‘Final Confirmation’ will pop-up in which you must confirm the action again. There is also an option to ‘Go back’.
Scheduling a send for a later time
It’s possible to queue your email campaign for delivery at a future date or time. (fig.17)
CC additional recipients
After clicking ‘Send’ or ‘Schedule’ it’s possible to CC up to 10 additional recipients. We recommend you use this to send a copy of your email to your branch official.

fig.16 preview – click to expand
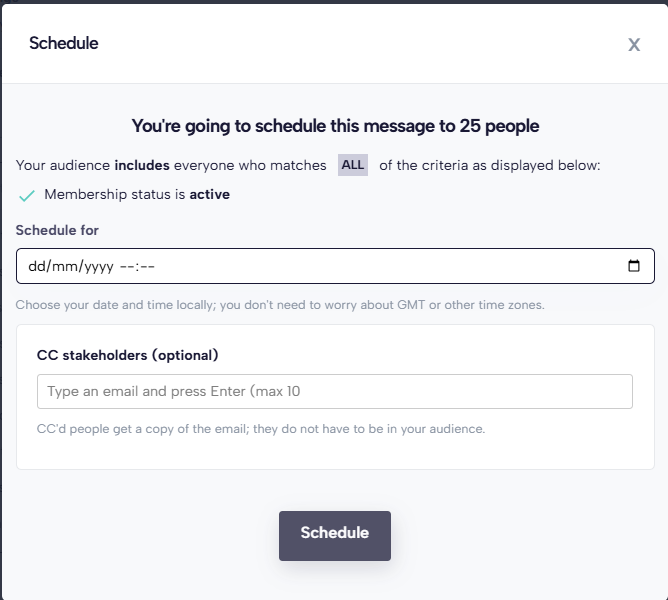
fig.17 scheduling send – click to expand
A while after sending an email campaign you can return to the Campaigns page to check how it was received. Sent campaigns show additional data in a ‘Recipients’ column. (fig.20)
If you click on the campaign name you can see a more information in the ‘Overview’. (fig.21)
- Recipients – the number of people in your audience.
- Open rate – a percentage showing how many people opened the email ÷ no. of recipients.
- Click rate – a percentage show how many clicked a link in the email ÷ how many receive it.
- Unsubscribe – the number of people who clicked the unsubscribe link.
- Bounce rate – the percentage of failed email deliveries.
- Links – a count of how many clicked each link in the email and the link destination.
Bounced emails
After send you should check your campaign bounce rate. Anything up to 2% is acceptable but rates above this, or an upward trend should be investigated.
To see which emails bounced, filter the table of recipients at the foot of the Details tab by the word “bounced”. You can also create an audience of bounced contacts via the audience builder.
If a member’s email is bouncing, ask them to update their contact details with us.

fig.20 campaign list stats

fig.21 campaigns overview – click to expand
On the lower half of a Campaign stats page you can find a preview of your sent email. There’s a ‘Send sample’ button on the top-right so that you can forward copies to other email addresses. (fig.22)

fig.22 stats overview – click to expand
On a second tab next to the overview, you can find a ‘Details’ tab. This provides a full recap of the configuration settings and headline statistics for the email campaign.
Below this the table shows a breakdown of recipients and a tick or cross to indicate whether they opened, clicked or opted-out of your email. You can also check the status to see if the email was delivered or bounced. (fig.23)

fig.23 stats details – click to expand
Member records in Movement are synced to the central member database each day. New members are added to mailing lists if they meet the list criteria and the records of ex-members are removed.
Access the member record
To access a member record click the member name in an audience list or find it via the top search bar. Under the member’s name you will see the membership no., their status, join date and positions held. (fig.24)
On the right you see the member’s age and email. The address and phone number are not imported into Movement. Below this under ‘Areas’ there are details about the membership including employer, workplace, branch etc. Some of these fields won’t contain data because they relate to Prospect membership.
Under ‘Subscription’ you can confirm whether a member has opted-in to receive email. Please do not change this or any of the supplementary information below it in custom fields. Although these are editable and it’s possible to add new custom fields, we ask you not to.
‘Movement Verify’ is another feature we ask you not to use.
Any changes to a membership record should be made via the membership team on the main member database. These will then be synced with Movement.
At the bottom of the member record page, the ‘Activity Log’ allows you to check which emails were sent to the member. (fig.25)

fig.24 member record – click to expand

fig.25 activity log – click to expand
If you encounter any issues while using Movement, the quickest and most efficient way to get help is to contact your Prospect official.
If they are unable to resolve your issue, they will contact our centralised Movement support team to seek a solution on your behalf or to ask somebody to contact you directly.
The more information you can provide when seeking support the better, for example:
- When did you experience the issue
- What device and browser were you using
- Include any relevant attachments, screenshots, screen recordings etc
Please do not report bugs to Movement directly.
A link to Movement’s support centre can be found at the foot of the left-sidebar. This contains some helpful guides on using Movement, but please bear in mind that the platform has been customised to meet our needs and some features referenced in Movement support are not enabled.
Movement users are bound by the terms and conditions covered by the Prospect privacy policy and the website guide: using online membership lists*.
*As per the existing guidance on using online membership lists:
Never distribute a membership list to anybody by email unless it is encrypted and password protected. Your IT support team should be able to advise you on how to do this. If you have any concerns or questions about data security or data protection please contact your Prospect/Bectu negotiating team or [email protected].